

Andrew Pollack's Blog
Technology, Family, Entertainment, Politics, and Random Noise| Professional Services | Second Signal | Presentations | Andrew's Blog | Support |
Follow Up HOW-TO: John Deere L100 Lawn 42" Tractor/Mower Brake Rebuild
By Andrew Pollack on 05/08/2011 at 10:10 AM EDTThis entry is a follow-up to a how-to I wrote in 2009 about adjusting the brakes on your John Deere L100 mower. Even if you're planning to do the full rebuild I show here, you should probably read that first. (link)
Back in 2009 when I wrote the original posting, I had no idea that 3 years later I'd still be getting positive feedback from people on it. I'm glad that I've been able to help people get their brakes working right, and I've decided to follow it up with more detail. For me, the adjustment was no longer working. I wasn't getting any kind of useful result any more and thought I'd need to replace pads or something else. I decided to tear into the assembly and see what there was to work out.
* Note: I call the part here a "caliper" which is, strictly speaking, not true. It doesn't move. It does sit very much in the way a typical disk brake caliper would and I just couldn't come up with a better way to refer to the part. If you have a better suggestion, let me know.
To refresh everyone's memory, the first picture here (from the original how-to) shows the brake assembly itself and the adjustment nut. The picture is taken from the "starboard" side (right side, when facing forward) of the tractor, just ahead of the rear wheel. If you want to find out more details about adjusting the brakes using this adjustment nut, please go read the original how-to.

What went wrong with my brakes turned out to be that the small metal rods, or pistons that fit through the outer caliper (pictures below) had gotten some corrosion on them and didn't smoothly fit through their bore holes any more. They were stuck. To get them out, I had to put the outer caliper in a vise, and use a nail set and hammer to gently tap them back out. I did this from the inside thinking that the corrosion was more likely to be thickest on the outside. Once I got them out, I cleaned and smoothed them, as well as cleaned and smoothed out the bore holes. When I re-assembled everything, I coated them liberally with water proof bearing grease. Basically, everything but the pads themselves, and the disk got a liberal coating of water proof bearing grease when I re-assembled the parts. Aside from smoothing the operation of the parts, this should keep the corrosion from coming back so quickly.
Before disassembling the brakes, I strongly recommend you are prepared with the following:
- A comfortable place in the shade to work, and good light
- A good quality 1/2" open end wrench (don't strip the adjustment nut)
- A good rust remover / penetrant
- A digital camera, to take pictures of each stage before you take it apart
The last item, the camera, is really important. There is more detail than you think while you're taking it apart. There are several small parts that must go back together in the right order -- and that order is not obvious when you go to re-assemble. There were a few places during re-assembly where I referred back to my photos to determine the order of parts (did that washer go before, or after the bracket?) or even location and direction of the parts. Taking pictures is quick and cheap. You can always delete them if you don't need them.
I also found that the adjustment nut can be very hard to remove, as that area is prone to rust. Make sure you have patience, give your rust remover time to work, and do not strip the adjustment nut or break the the threaded part of the caliper it is on. If you damage those threads or break that threaded bolt part, you will have to replace the outer caliper and it is a dealer-only part.
I found that the best way to access the brake parts was to put blocks down at the front wheels to keep the tractor still, then jack up the back end and support it on jack stands. Then I could remove the starboard side wheel and have clear access to the area.
Once you have re-assembled the brakes, I suggest you quickly read about adjusting the brakes using this adjustment nut in the original how-to.
Below are some photos of the parts, and a few tips for those of you who want to try this yourselves...
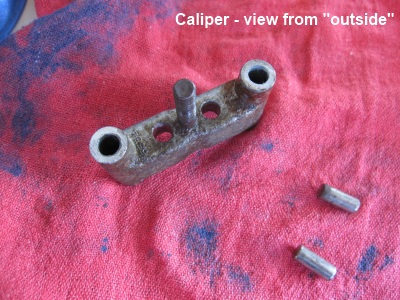
Seen from the top, the center "post" is the threaded bolt that the adjustment screw threads onto when this caliper part is facing out and installed on the mower. Next to it, you see the two small piston rods that should smoothly slide in and out. These take the pressure from the plate that applies the brake, and push against the brake pads. Mine had just enough corrosion on them to prevent them smoothly moving through the bore holes.
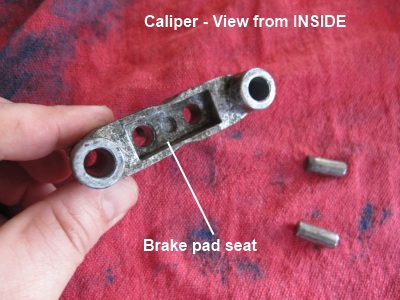
This is the same part, the outer caliper, seen from the inside. You can see where the brake pad seats. On this outer caliper, there is a metal backing plate that goes against the back where it can contact the piston rods and evenly distribute their pressure to the pad. The backing plate goes in first, then the pad. I cleaned the backing plate to remove corrosion and applied a very thin later of grease to it. Be careful not to get any grease on the brake pad itself.
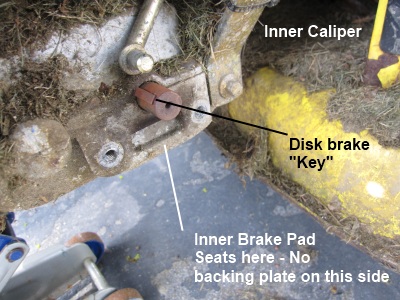
Once you have the outer caliper removed, you can easily side the brake disk itself off this axle. You can see that the axle is keyed to prevent the axle spinning independent of the brake disk. What you don't notice right away, is that the key is itself a very small part, and sits in a recess on the axle. Don't loose this little moon shaped key! Also note that the key "rocks" so you may have to work it back and forth a bit as you put the disk back in place to make everything seat right.
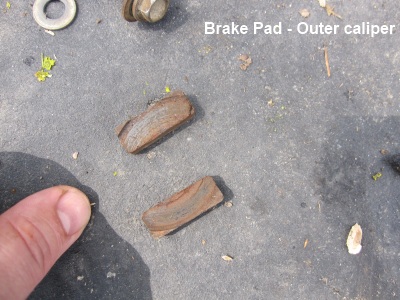
This last picture just shows how small the pads themselves are. Mine are worn down about 1/8 inch, which you can tell because the disk is round, so the bottom corners of the pad are not worn. This isn't a problem. That's why the adjustment nut is there.
Once you have re-assembled the brakes, I suggest you quickly read about adjusting the brakes using this adjustment nut in the original how-to.
Finally, I would like to invite you to please leave a comment here if you found anything wrong, have some advice to add, or found this useful. I really do enjoy hearing from people who use these kinds of how-to articles.
description- I did locate the lever and adjustment and tightened the nut to
achieve better braking but now I get a metal grinding sound- that is when I
decided to check out the internet and found your posting- I will follow your
directions to see what the rest of the problem is
thanks again
Skip
that same grinding sound and noise. Did you find anything?
fast trip down the hill and I started looking for broken or missing parts, then
messing with the brake bolts, then trial and error to adjust. Thanks for taking
the time to help others !
seasons then you need to replace them when the adjustment nut does not let the
brakes lock anymore. It is really not a lot of wear on the pads but the caliper
bottoms out.
Bob Laferrriere
Thank you for putting this info on the E-net. I looked everywere and could not
find it. You have helped me A-LOT!!! THANK YOU!!!!!
Jeff
anything in manual. Thanks for the help. Mower is only two years old. I had the
last JD mower 17 years and never needed to adjust the breaks so could not guess
what the problem was.
Runs great but NNO BRAKES. Am in process of cleaning it up and article was
exacly what I was looking for! Brakes seem VERY INADEQUATE for mower, but maybe
some new pads and adjustment we can use it! Thanks a bunch for taking time to
do article!
you! Thank you! Thank you! Thank you! Thank you! Thank you! Thank you!
Thank you! Thank you! Thank you! Thank you! Thank you! Thank you! Thank
you! Thank you! Thank you! Thank you! Thank you! Thank you! Thank you!
it will be a matter of a very small pick, or else if you really can't any other
way, then drill a very small hole right into it and then drive a screw in so
you can grab it with the threads. Make sure you order the replacement pad
and have it in hand before you destroy the one that's there though.
tightened the adjustment nut to tight and snapped the caliper right in two!
were frozen in place and couldn't move to put pressure on the brake shoe.
Follow the link in the story above there to look at how to rebuild that whole
unit. You'll need to tap those little piston rods out and clean them up like I
did before the whole thing will work right.
google and there is still nothing about how to do the rebuild. Your adjustment
can be found, but I only found the rebuild page through the adjustment page you
wrote. Again, thanks a bunch. And yes, I have one of those first year Deeres
from Home Depot, thinking it was a great price on a REAL John Deere.
information thanks for taking the time to post it!
JD's page with all the parts numbers and diagrams. That way, you'll know where
to look if you need any other parts.
http://jdpc.deere.com/jdpc/servlet/com.deere.u90490.partscatalog.view.servlets.H
omePageServlet_Alt
Click on the model > click on 'sectional index' > click '50 - power train' >
click '17 - transaxle shifter, brake and case'. There's the diagram and
section of the parts list where you'll find the parts numbers.
should open up to the right section.
enjoyed reading your repair procedure and method of repair. When this comes up
I will be more familiar with what to expect and thank you for the input.
for your help. was cutting my grass when my brakes gave out going down a small
hill .it scared the you know what out of me when i shot across the road in
front of my house. this is the info i been look for thank you so much
love you !!!!! I did it. not the brake rebuild, but tightening the nut so that
I have brakes on the ol John Deere. If it wasn't for searching the net and
finding your post, I'd still be sitting here watching the grass grow and crying
about it every day. I was in a desperate situation. My hubby always cut the
yard, when I say yard, its actually acreage. The brakes quit working this past
summer, and he got sick so fixing the brakes wasn't a priority during the
winter, and then he passed away 2 months ago. I sit here every day watching
the grass get higher and higher, and since we live in the woods, it wasn't like
some nice young teenager was stopping by to ask if they could cut it for me.
So I started to see what I could do on my own as I couldn't afford to pay
anyone to work on the old Deere, and WA LA!!!! I found your post. thank you,
thank you, thank you. It took me longer to find a wrench than it did to fix
it. Never did find a wrench but the socket set worked great!!!
generous with this critical information.
not! I adjusted last year and it went fine. Then this spring..nothing. a
little adjustment helped but quickly went away. So I took it apart and cleaned
buffed the plungers. Plung holes as well but it's tough to get them shiney
smooth. All n' all it was great and my plungers WERE frozen in place. The only
issue I had and still do is that I could not get the starboard wheel off, so I
had to do it with it on. Better for sure if you get the wheel off but I tried
everything I know, short of firing up the torch. If anyone has any ideas on how
to get a stuck wheel off, let me know please. I used the best penetrating oil
and pounded on it with a wood block..it will not budge. Need to get this
done..HELP!! Thanks again. You got any more tricks up your sleeve to share? I
did put a new engine on my L100(from 17 to 23hp)...oh ya, that works!
fast you spin those blades it isn't going to turn into a hovercraft, right?
As far as your wheel -- are you sure you got the retaining clip off? I know,
sounds like a dumb question, but it has to be asked. Are you able to get the
other wheel off?
I've used Zep's rust dissolving sprays before to good effect, if given a little
time to work and repeated spraying, but if that doesn't work, I would clean off
any and all flammable oils I'd used then use a map gas torch to heat the outer
part of the wheel where it goes onto the axle. It will take a lot of heat to
get that to expand, and I'd probably turn the wheel while doing it so it was
even. ** I have no idea if this is the right approach, you understand, it's
just what I'd be likely to do. It definitely could be the wrong thing and then
I'd be wrong again. I'd have to add it to my long list of things I've been
wrong about.
everything was full of grease. Once that I clean ever thing and put it back and
ajusted the brakes every thing was fine. Next time that I am out I will pick up
new pads.
Thanks Joe
I ordered the break pads from a John Deere Dealer for $27.40 including
shipping. I had the parts in a few days, they were sent directly from the
manufacturer in my case.
Make sure the key on the rotor doesn't slip out on re-installation. I had to
take everything apart again to install the key again. I should have checked it
before putting it back together.
My rotor was rusted on the shaft which caused the outside pad to wear out
without wearing the inside pad. I used liquid wrench to loosen it from the
shaft. a little prying got it off. There was no room for a puller to attach
to..
The break adjustment was easy to get at with the tire on.
your did the clutch brake pedal only acts as a clutch at the moment if im going
down my yard to my barn i hit the pedal and i eminently go faster. i am a
certified small engine mechanic but i don't want to screw up so which way do i
adjust the caliper adjustment nut left or right. I'm thanking its righty tighty
but didn't want to strip it may it be a reverse thread. open to emails thanks
Dustin
informative while remaining concise than many repair manuals or postings
The most important item is the digital pictures!! Recently finished a
resto-rebuild of a 1965 Massey 135 that took two years. Must have looked at my
pics twenty plus times and wondered if I took enough pics. Thanks for sharing!
Gpops
try to push it while it is in neutral. I tried your adjustments with no luck.
I was wondering if you thought rebuild would help before I attempted it.
Thanks again.
lawnmower clutch/brake assembly? I must have a look se, but not right now, in
the middle of January in Newfoundland!!! Brrrr.. Not shade I want, it's the
SUN!!! :)
For the man who had the wheel rust frozen onto the axle, there is a tool you
can buy but its not cheap! Looks like two steel bars, that go on either side
of the back of the rim, a connecting puller 'bars/rods' that go to one bar in
from and a large 'bolt' that goes thru the center of the front bar against the
axle top. You drill a little 'hole' or divot into the axle, put the two bar
assembly behind the tire/rim, connect the front bar and then dril/tighten the
bolt against the axle, thereby pushing the front bar away and pulling the two
rear bars with it, and hopefully bringing the rim/wheel assembly with it! If
I can find the weblink to the commercial version I will add it... Might save
someone a lot of trrouble.
http://www.tractorforum.com/f154/gear-puller-modified-mtd-wheels-21197/
This is sorta the idea except instead of the 'jaws' picture a steel bar right
across // the top/outside with a large bolt like the
gear
____________//___________ puller's bolt, in the centre.
/O__________O________O_/ then two bars in behind the wheel
// // // rim. tighten the bolt
against the axle
// v // pulls the rim right
off.
// //
//____________________//
//____________________//
=====================
hard to draw the idea with ascii characters.. picture almost a ladder assembly
behind the wheel...
______________________
you meant about the right side looking forward. My lest right is based on
standing behind the tractor and looking forward toward the front. Just
saying. Thanks again for your help.
and last JD.Very disappointed with the quality
I've rebuilt several brake assemble's and had no problem until this
one....can't seam to find a point where it will work properly. Is there
supposed to be a spring between and the cam arm and washer?
Nice job on the detail !!
J.B.
bits aflame, and no brakes. I've been considering making a modified version of
the the pressure plate arm (or whatever they call it -- that bit of bent metal
that applies the pressure) to change the location of the fulcrum, resulting in
move movement but requiring a bit more pressure on the brake. I haven't sat
down with a sketch pad yet to see how much modification would really be
needed. I'll probably have to bolt on some kind of pivot point, but maybe just
tightening up the interplay at the point where the brake arm connects to that
metal plate would be enough. It's going to take more time than I've been
willing to give it.
I just got my moms 180 tractor that sat for 6 years.
The motor started but the brakes were locked up.
I got the pads and new disc but just learned from your Blog that the pins on
the caliper need to be freed up.
I'm gonna soak the caliper and pins in a penetrating oil to break the pins free.
Once again your article was super helpful!
Thanks again!
Tom S.
to replace the pads. The pistons were stuck. I punch those out and than cleaned
and lubed piston holes. Working fine.
Thanks a mil
Mr. Johnnie Holley
HAVE in the first place! This article of yours has been extremely helpful to
us Do-it-yourself John Deere owners. I guess the "secrecy" on the part of John
Deere has to do with keeping more "service" money coming their way, but from
what I'm reading on John Deere reviews, a lot of their service is lacking.
Thank you so much for your attention to detail with special attention to those
of us who tend to disassemble before looking closely (lol). Very good article
sir!
going to tare into it in the morning. Lord willing.
Where is the clutch disk?
didn't find it before my wife drive through our shed when she couldn't stop
because of the failing breaks thank goodness I put a brush guard on the
tractor, oh well lesson learned, Thanks again for the info. Oh yea any ideas on
how to repair a shed with a hole the size of the front of a JD D100 lawn
tractor.....
Best regards,
JC
Miami
up. But...I could not push the break release down or depress the brake/clutch
pedal. Is this the problem you address here or is there another repair
needed. I tend to tear lawn equipment down, make things worse then buy new
equipment! I'd like to break that cycle. Look forward to your reply.
Thanks,
Larry B
Very helpful. Thanks, again.
Pictures are perfect. Much obliged. Drew
lose the axle key. I bought a John Deere L100 for cheap because they did just
that and didn't know there was a key. They thought the transmission went out
because it wouldn't go forward or reverse. Put a new key in a walla a good
riding mower for cheap price.
follow directions well, so should be a simple fix now to have brakes!!!!! After
searching for a week found your information. Thank you again
being female has anything to do with it though. I've never found a case where
a penis was required to hold a wrench or for balance or anything like that.
Many of the most technically savvy people I work with are women. Don't let the
little boys keep you away from the tools!
pads if needed.
with you to get the right size.
John Deere to tell you how. Helped a lot.
Ken
put new brake pads (little rectangles) in my JD Model 170...but still have no
brakes. If I really tighten the adjustment nut, it locks the trans and I can't
even push the tractor by hand in neutral, but just backing off the adjustment a
little frees up the tractor to be pushed, But I have no brakes...pedal just
easily goes to the floor. It seems the "cam" just doesn't push the
plungers/pad to the disk with enough force to stop the tractor. Doesn't even
slow it down. I thought maybe the previous owner installed the cam
"backwards" but turning it made no difference. Any thoughts will be
appreciated. Also what is the purpose of that little bracket that goes from
the adjustment to the forward bolt on the caliper? Thanks, Bill
It's hard to know what you're seeing. If tightening the adjustment nut results
in locked brakes, but there's no point where backing off allows the brakes to
work without spinning freely, I would have to guess there is a linkage problem
somewhere. Maybe a bent rod or something not connected. Something isn't
transmitting the pedal press to the angled metal to press on those pins or else
the pins themselves aren't moving unless so much force is applied that you
couldn't do it with the brake linkage. If you've already done the rebuild on
this post and made sure those pins move smoothly and of course you don't have
grease on the disc, then I'd start looking at the linkage between the pedal and
the brake assembly to see if you're getting any movement at all transmitted to
the brake.
@
tractor and I went over a drop off at the end of my yard and piled into a huge
rock. Fortunately, I wasn't injured, but I have to get my tractor pulled out of
there and assess the damage. This is definitely a very bad design. I don't
think I'll ever buy another low end John Deere again.
REBUILT THE BRAKES ASSEMBLY, FREED THE PINS - WORKS LIKE A CHARM!!
grinder and simply cut out the size brakes you need from an old disk brake from
any car. Saved me $35
it from trans axle manufacturer.
by bootstrap
on this. Thanks so much. Bob
I guess today, almost 15 years later, I'd have had to make a youTube and I'm
sure it would have been annoying to sit through like most of them are.
Still helpful in 2025 !!
Thanks again
been sitting out in someone's yard, solely because we needed the mowing deck. I
got it working except for the brakes, and cleaning the pins and adding a little
silicon grease inside worked wonders. You're a good man :)
no longer wanted to mow. (We are all old around this neighborhood.) Definitely
some maintenance required but the braking was the problem - Gone. The manual
had nothing. Your information is very appreciated. Good luck to you in the
future. Do you have any other tutorials for this L100. I am trying to keep it
running so as to avoid the really high prices for something new. Thank you
again.
Other Recent Stories...
- 27-08-2025Updated Quick Reference to Create SSL/TLS Certificates manually for CertStoreIt's been a long time since I've added anything about Domino here, but I wanted to put this where I'd find it next year and though some of you might find it useful as well. There's lots of instructions out there around using "LetsEncrypt" or whatever to generate short lived SSL certificates for Domino, but if you want to use a full blown certificate authority -- or maybe your company does self signed certificates and you want to use those, here's a quick reference. Prerequisite: You should already have ......
- 01/26/2023Better Running VirtualBox or VMWARE Virtual Machines on Windows 10+ Forgive me, Reader, for I have sinned. I has been nearly 3 years since my last blog entry. The truth is, I haven't had much to say that was worthy of more than a basic social media post -- until today. For my current work, I was assigned a new laptop. It's a real powerhouse machine with 14 processor cores and 64 gigs of ram. It should be perfect for running my development environment in a virtual machine, but it wasn't. VirtualBox was barely starting, and no matter how many features I turned off, it could ......
- 04/04/2020How many Ventilators for the price of those tanks the Pentagon didn't even want?This goes WAY beyond Trump or Obama. This is decades of poor planning and poor use of funds. Certainly it should have been addressed in the Trump, Obama, Bush, Clinton, Bush, and Reagan administrations -- all of which were well aware of the implications of a pandemic. I want a military prepared to help us, not just hurt other people. As an American I expect that with the ridiculous funding of our military might, we are prepared for damn near everything. Not just killing people and breaking things, but ......
- 01/28/2020Copyright Troll Warning
- 03/26/2019Undestanding how OAUTH scopes will bring the concept of APPS to your Domino server
- 02/05/2019Toro Yard Equipment - Not really a premium brand as far as I am concerned
- 10/08/2018Will you be at the NYC Launch Event for HCL Domino v10 -- Find me!
- 09/04/2018With two big projects on hold, I suddenly find myself very available for new short and long term projects.
- 07/13/2018Who is HCL and why is it a good thing that they are now the ones behind Notes and Domino?
- 03/21/2018Domino Apps on IOS is a Game Changer. Quit holding back.
totally convinced that a third grader must have designed it. I cleaned
everything up and adjusted the nut. My first run around the yard yielded a good
trail of smoke as my pads were almost on fire. I loosened the nut some and now
the mower seems better. However, as you mentioned, the brakes don't stop the
mower on a steep hill...which I have. It's a dangerous design for anybody
mowing on a slope, as the mower refuses to stop quickly when moving down a
hill. The braking system will be the first thing I look at when I buy my next
mower, as this one is junk!